Extension Page Explained |
  
|
Extension Page Explained |
|
This topic explains more details of the Extension Page.
To go to the extensions page
1. Ensure you are on the PBX & Call Center page.
2. Click Extensions ![]() located on the left side. The web page refreshes to display the following page.
located on the left side. The web page refreshes to display the following page.
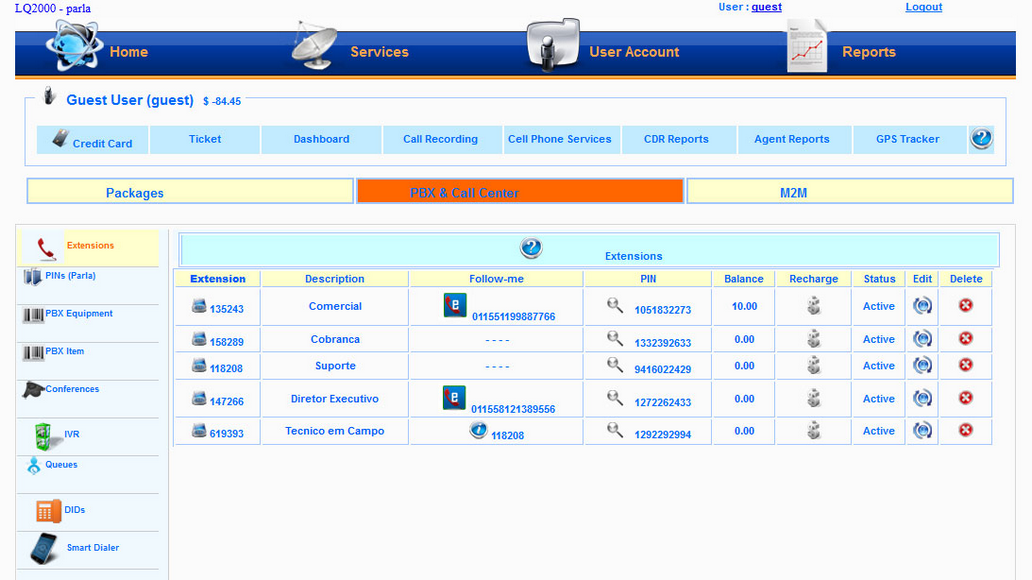
The important elements of the Extension Page
1. Extension column - Lists one or more extension for the user. User has both the ability to create more extensions or decide who in the group gets which extension.
To add an extension click this link. Adding a New Extension.
2. Description column - A brief description of the extension.
3. Follow-me column - Also known commonly as call forwarding. This column contains the alternate number where the call is directed to in case the extension does not answer an incoming call.
Note: This number could be another extension on the system or an external land line or cell phone number.
To add or edit Follow-me's refer this topic Adding a Follow-me number
4. PIN column - Displays PIN number if any for Pre-paid cards that are associated with that Extension.
Note: Click the lens beside a PIN number to view details of all calls made to and from that Extension using that PIN number. A new page opens displaying drop-down list to filter the information on calls. User can choose from one or more of Start Date, End Date and Month/Year filters.

Click submit to display the results. A new page opens to display the details. Caller-Id information of callers are also displayed.
5. Balance column - If balance is zero dollars then external calls cannot be made from this extension.
Note: Extension to Extension calls are free.
6. Recharge column - Using this users can recharge and add funds to their balances via funds in their Bank account.
Note: Will work only if there are sufficient funds in the Bank Account. However Admin can override even if there is no credit and can recharge an account.
7. Active column - displays if the Extension is active or not.
8. Edit column - Click to edit details of the Extension.
9. Delete column - Helps to delete and Extension.